
Aws mysql db in a custom vpc
Just another How I Built It post. Let’s start with the all-important What? and Why?
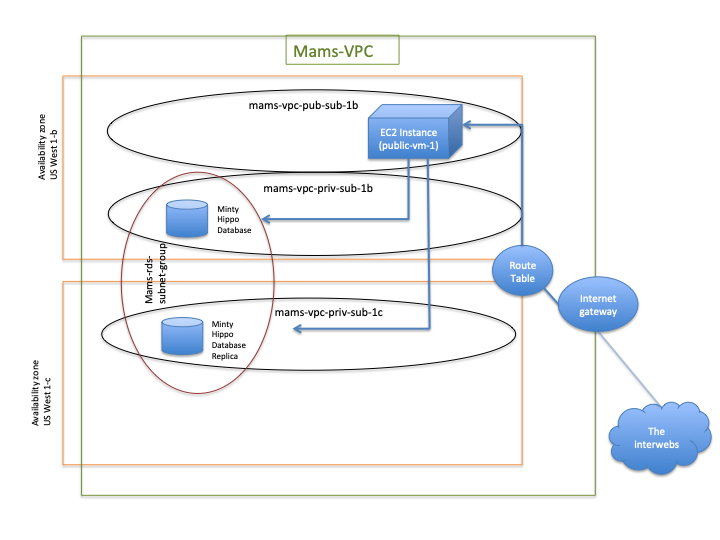
What? I created a custom Virtual Private Cloud (VPC) in Amazon AWS. I created this VPC with public and private subnet partitions. I deployed a private MySQL Database within the private subnets within my VPC. I then created an EC2 Instance (A virtual Linux Server) in the public subnet within my custom VPC in order to connect with the MySQL Database.
Why? The architecture that I’m trying to get some dexterity with here seems really useful if you have an application that you would like to host on the web which needs to read from, and possibly write to, a database. I happen to have an R-Shiny application that I would like to host on a webserver. I intend for this application to read and write from a database. The database will contain some sensitive information that I do not want to be accessible from the internet. Point of clarification: I will not be demonstrating deployment of this R-Shiny App in this post. Here, I’m just covering how I set up the VPC and connected an EC2 instance to the private MySQL database.
How? This really, really long post is going to walk through how I did this.
Here is a summary of the steps:
- create a custom VPC
- create public and private subnets
- set-up internet gateway
- set-up route table
- create security groups
- create subnet groups
- set up a private MySQL database in AWS/RDS inside the private subnets within the VPC
- set up a virtual server in an EC2 Instance in a public subnet within the VPC
- connect to EC2 Instance from local workstation
- connect EC2 Instance to the RDS Database
- check to see that MySQL Client is installed on EC2 server
- connect to the EC2 Instance via SSH protocol
Big Picture & Resources
Here are some resources and references:
- This build was an assignment in an online class I’m working through. The class is here if you’re interested.
- here’s a really good, but pretty dense/technical tutorial
Here are some short vignettes on topics relevant to the material below:
I will also mention that I wrote this post about creating a public MySQL database in Amazon AWS/RDS.
Without further build-up, I’ll now go through the steps I outlined above 1-by-1:
1. Create a Custom VPC
Goal: to create the ‘mams-vpc’ virtual private cloud with public and private subnets.
As noted above, the custom VPC plays an important security role. By launching an AWS/RDS instance in a VPC, it is only accessible by other resources that also reside within that VPC. In this case, access to the database will be limited to the EC2 instance that will be spawned in the same VPC. Since access to the EC2 instance is controlled by the use of a unique encrypted private key pair, the database is not exposed to random internet traffic.
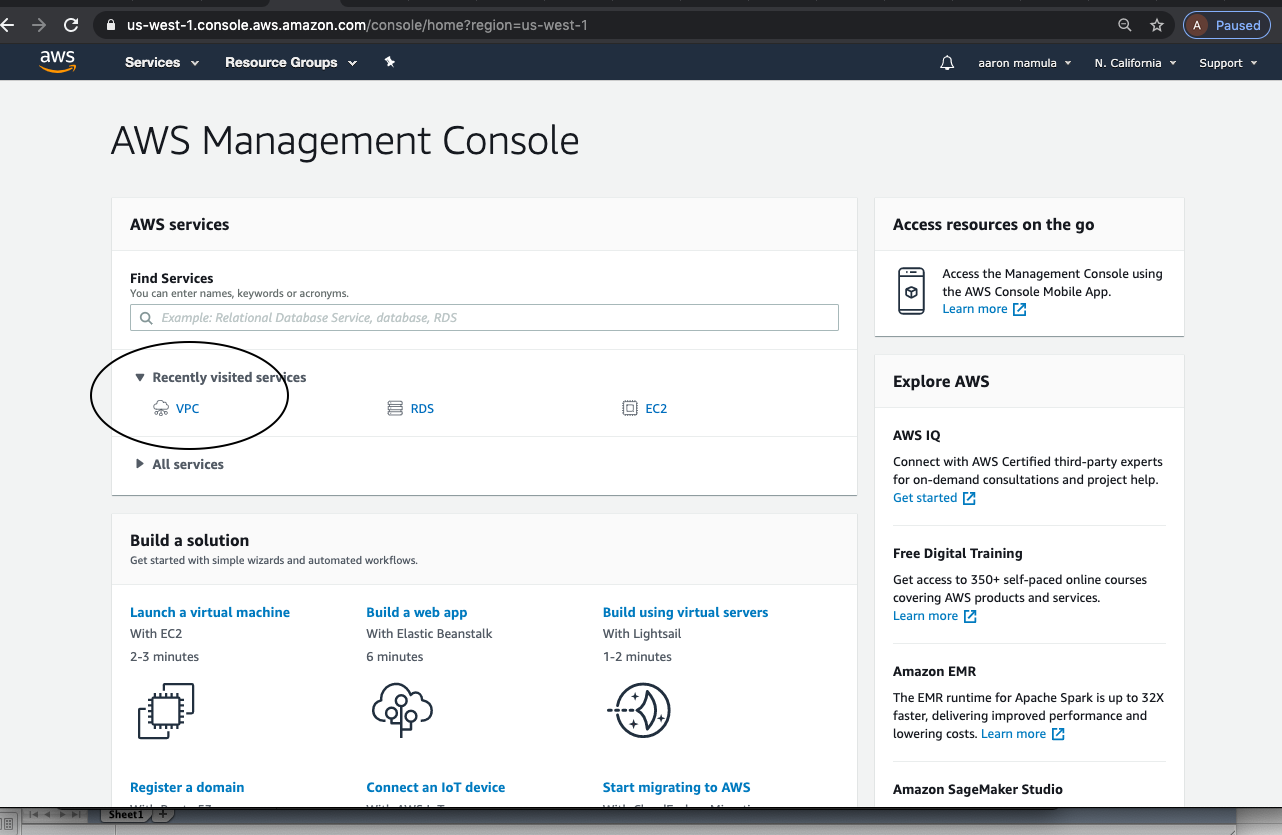
- From the AWS Dashboard use the Services drop down menu and search for “VPC”.
- Use the left-rail navigation and select “Your VPCs”
- Find the call-to-action for “Create VPC”
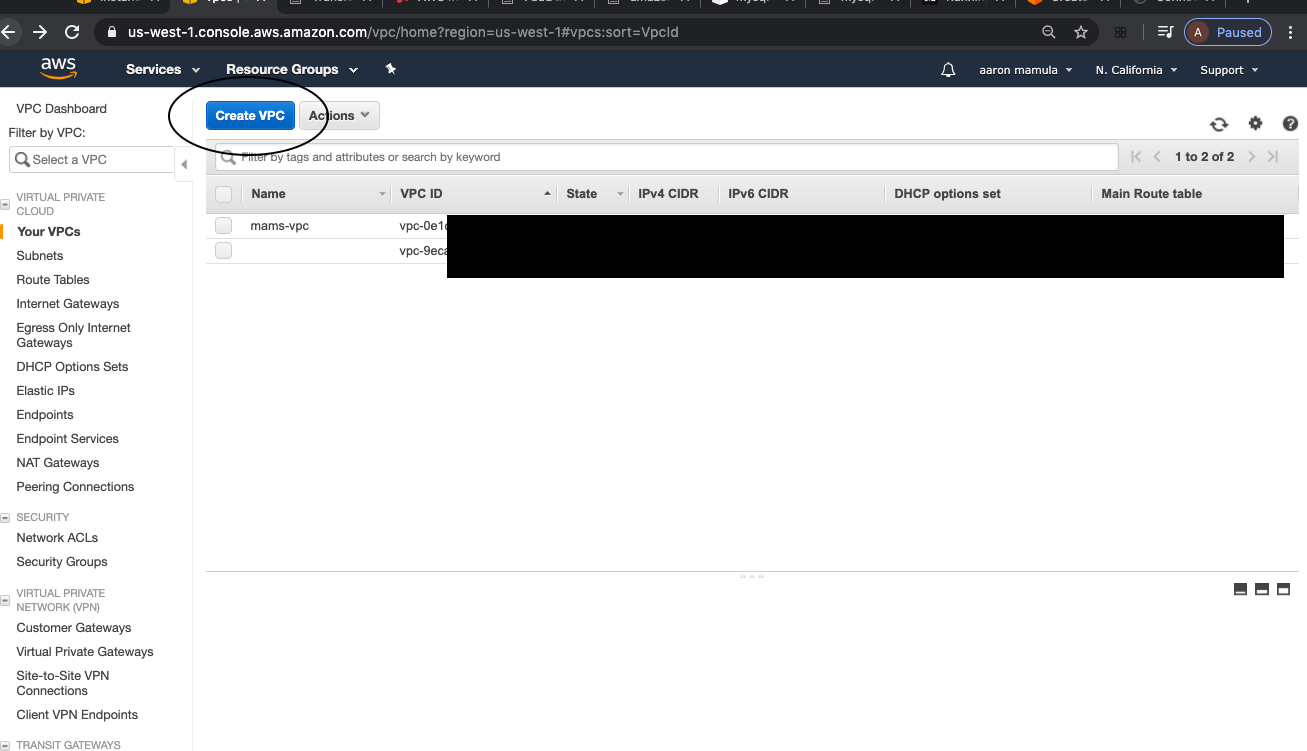
I named my VPC mams-vpc and assigned it the CIDR block 192.168.0.0/16. I don’t claim any real knowledge of CIDR blocks or how to use them to set up a VPC. I used this block because some rando on the internet said it’s an ideal block to use for setting up VPCs in AWS.
1.1. Create Subnets w/i the VPC
The architecture I am using for this project is to have an RDS database deployed in a private subnet within a VPC and an EC2 Instance that will function as a public-facing webserver.
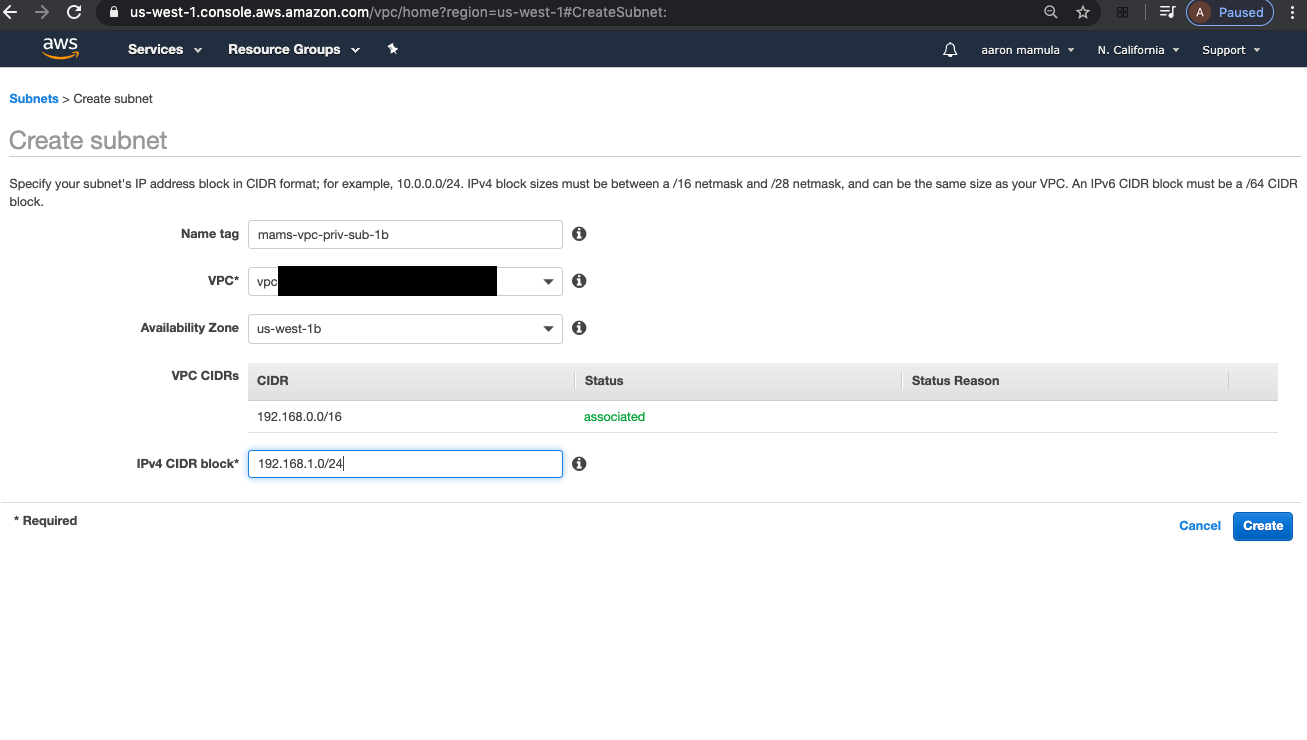
The next step is to create these subnets. From the VPC Dashboard within AWS:
- look to the left-rail navigation and click “subnets”
- “Create subnet”
1.1.1. Create the Private Subnet
1.1.2. Create the Public Subnet
The steps here are the same as for creating the private subnet.
The only difference between the public and private subnets will be the security features we assign to these subnets later.
At this stage, it also deserves mention that I actually created 2 private subnets
- mams-priv-sub-1b
- mams-priv-sub-1c
This is because I’m going to be deploying my RDS database in two different Amazon Availability Zones (multi-availability zone configuration). This is not critical for the task at hand.
1.2. Internet Gateways
For the public subnet we need an internet gateway so that the AWS resources like EC2 Instances deployed within the public subnet can get internet connectivity.
From the VPC Dashboard left-rail navigation:
- chose “Internet Gateways”
- “Create Internet Gateway”
1.2.1. Attach Internet Gateway to VPC
From the VPC Dashboard:
- find “Internet Gateways” on the left-rail
- click the radio button to the left of the internet gateway that you wish to attach to a VPC
- Using the “Actions” button above the table select “Attach to VPC”
1.3. Create Route Tables
From the VPC Dashboard:
- left-rail navigation, “Route Tables”
- “Create Route Table”
Here, I’m creating a route table for the private subnet so I’m giving it the descriptive name, mams-vpc-priv-rt.
Here’s a moderately interesting aside: when I created my VPC, AWS created a default Route Table for that VPC. Curious readers may be wondering why then do I need a new route table when a default route table exists? Basically, it’s because I created two subnets: one public and one private. Any AWS resources deployed inside the private subnet must not get public IPs or internet connectivity. So that default route table will get assigned to my public subnet while this new route table is going to get assigned to the private subnet.
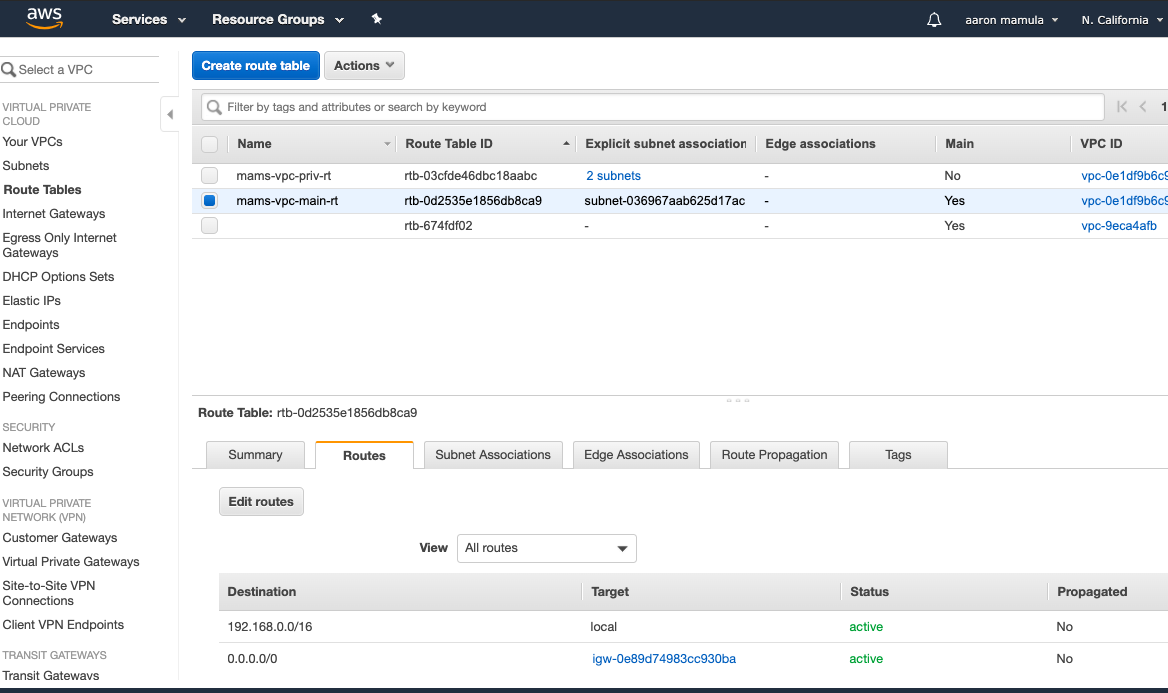
Here, you can see that my set-up has a route table (mams-vpc-priv-rt) with a local-only route,
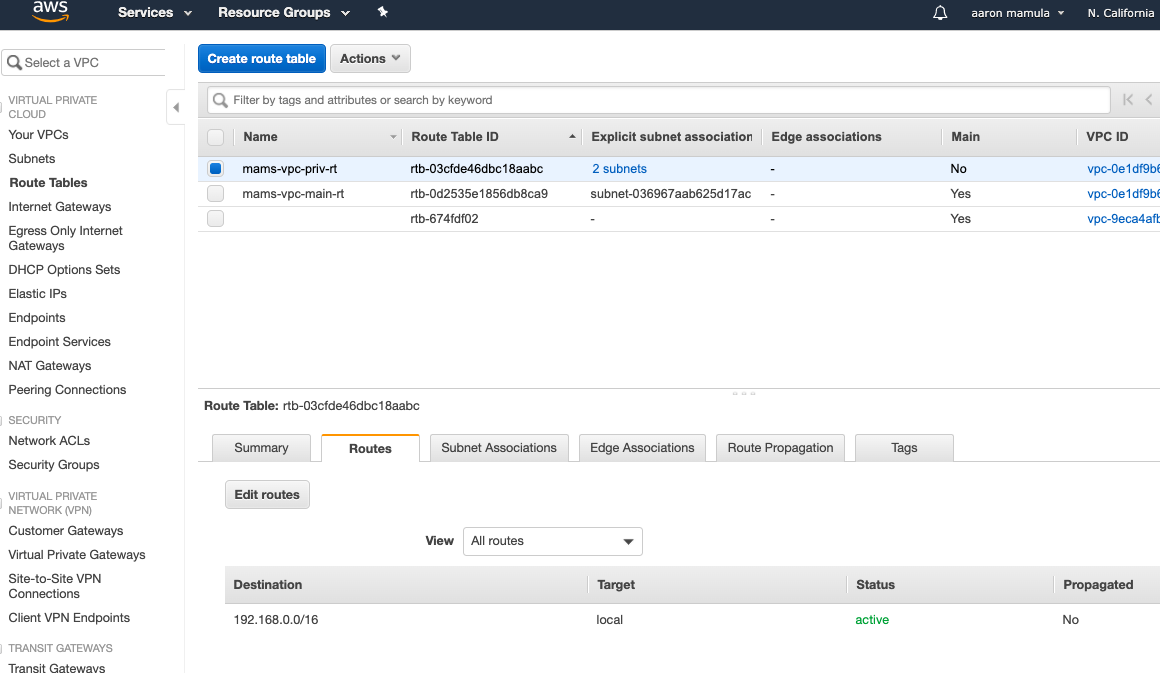
and default route table with a local route and a route to the internet gateway.
1.3.1. Route Table Subnet Association
There’s one more step that I need to set up the route tables. I want my private subnets associated with the private (local only) route table and I want my public subnets associated with the public (internet connectivity) route table.
From the Route Table Menu I select the route table that I want to edit, then:
- choose the “Subnet Associations” table
- make sure that only the subnets I want associated with this route table are checked
- save changes
- repeat for the other route tables
1.4. Create Security Groups
From the VPC Dashboard:
- in the left-rail choose “Security Groups”
- use the “Create Security Group” call-to-action to launch the security group wizard
- give the new security group a name and description (mine is mams-rds-db-sg)
Next, I’m going to create a security group for the soon-to-be-created EC2 Instance. Same drill as above:
- from the VPC Dashboard find “Security Groups” in the left-rail
- use the “Create Security Group” CTA to launch the security group wizard
- I’m naming this security group public-vm-sg
In my architecture, the MySQL Database in AWS/RDS (the minty hippo database) will reside in the mams-rds-db-sg and the EC2 Instance (still yet to be created) will reside in the public-vm-sg security group
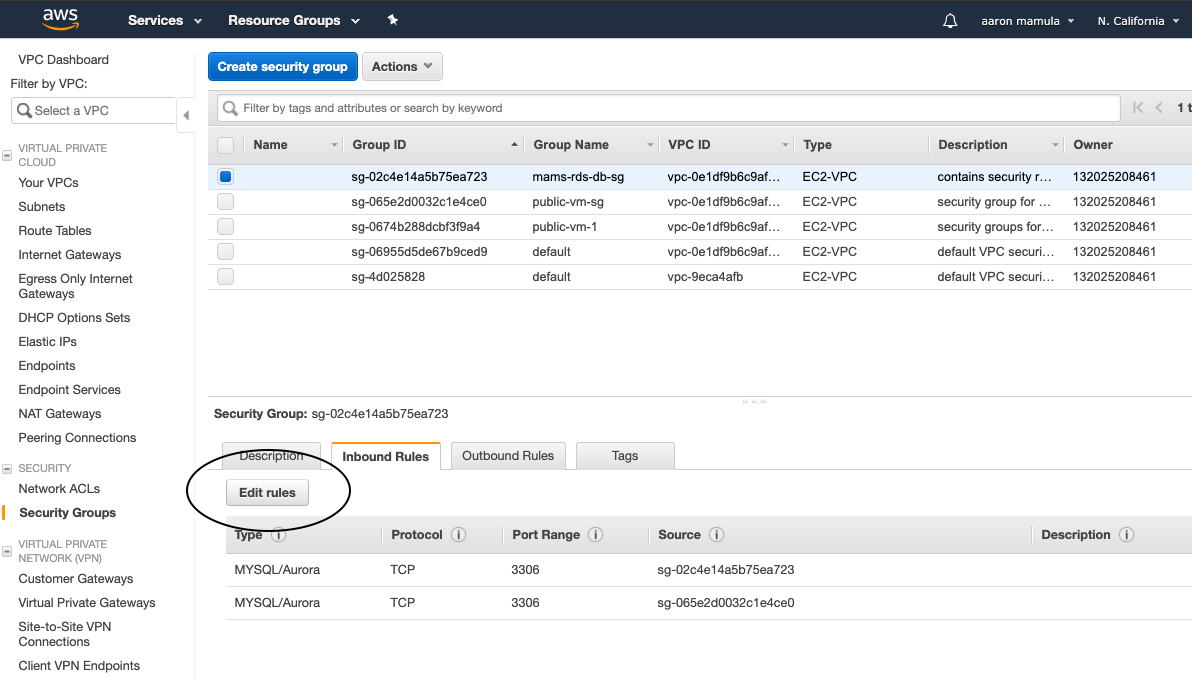
1.4.1. Edit Security Group Features
Since I want my EC2 Instance to be able to communicate with my RDS database, I have to edit the inbound rules in the mams-rds-db-sg. Here, I’m setting an inbound rule for mams-rds-db-sg of type “MySQL/Aurora” to accept a MySQL connection from resources within the public-vm-sg security group. Again, this is because my EC2 Instance will be governed by the public-vm-sg security group and I want to connect my EC2 Instance to the MySQL database that is governed by the mams-rds-db-sg security group.
To set an inbound rule for the mams-rds-db-sg, navigate to the VPC Dashbord and find “Security Groups” on the left-rail nav:
- In the top table, I select the security group I want to edit
- Using “Inbound Rules” tab to view the inbound rules
- Use “Edit Rules” to set a new inbound rule
1.5. Create Subnet Groups
I promise this tutorial is rapidly approaching the part where I actually create the database…The last of the foundational steps here is creating the subnet group where the RDS database instance will live.
From the RDS Dashboard:
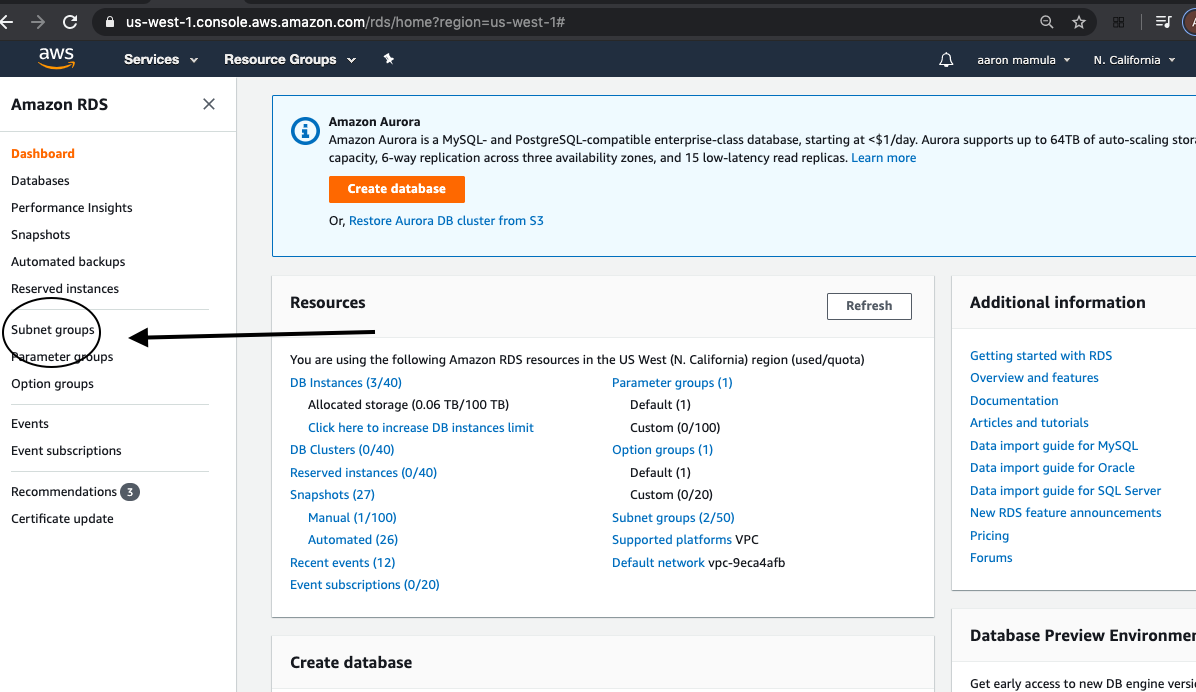
- find “subnet groups” in the left-rail navigation
- above the table displaying existing subnet groups find the CTA button “create database subnet group”
- the table below shows the fields needed to create a new subnet group and the values I picked for each field
| field | value |
|---|---|
| name | mams-rds-subnet-group |
| description | subnet group for rds instance |
| VPC ID | mams-vpc |
1.5.1. Assigning subnets within the subnet group
The final step in creating the subnet groups is to assign subnets within the VPC to this subnet group.
This step is not difficult but does require a little attention. Within the mams-vpc VPC, I have 3 subnets defined. Two are private subnets and one is a public subnet. Because this is the subnet group in which I will ultimately provision my private Database Instance, I want to assign ONLY THE TWO PRIVATE SUBNETS to this subnet group.
2. Launch an AWS/RDS Database in the Custom VPC
So this is approximately where the fun stuff starts. I provided some detail on provisioning an AWS/RDS MySQL Database Instance in this post.
The current project follows these same steps with a couple important differences. When launching the database instance for this build versus the prior post, the following optional fields are populated differently. Here are the key fields and values that differ between this build and my last AWS/RDS Database Instance.
| field | value |
|---|---|
| Multi-AZ Deployment | yes |
| vpc | mams-vpc |
| subnet group | mams-rds-subnet-group |
| publicly accessible | no |
| vpc security group | mams-rds-db-sg |
First, I set-up this database instance in a Multi Availability Zone configuration. Again, this has no material impact on the goal of this post (I have future project in mind that will require Multi-AZ configuration so I’m looking forward a little).
Next, I launched the database instance in the custom VPC (mams-vpc) I just created, with the subnet group governing the private subnets, and within the security group I set-up for this custom VPC.
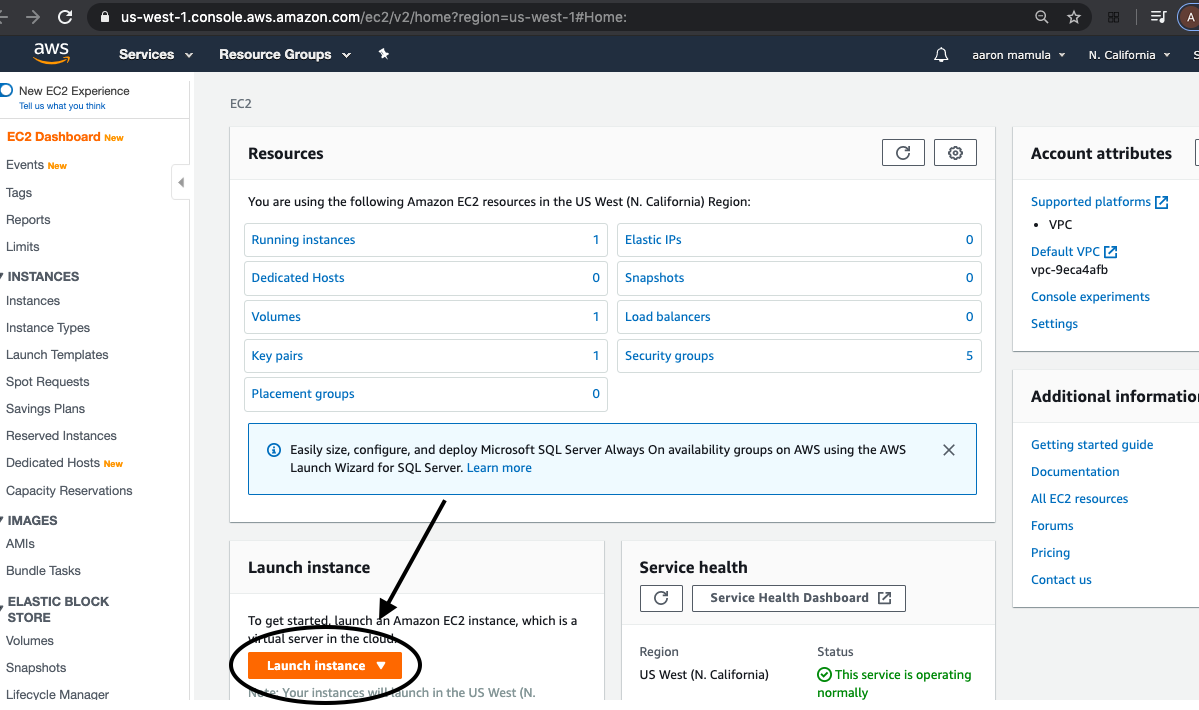
3. Provision an AWS/EC2 Instance
In this step I’m going to launch an EC2 Instance inside the custom VPC I created (mams-vpc) for the purpose of connecting to my RDS MySQL database.
To do this I navigate to the EC2 Dashboard and look for the “launch instance” call-to-action.
The next step is choose the Amazon Machine Image (AMI). I chose an Ubuntu 16.04 AMI.
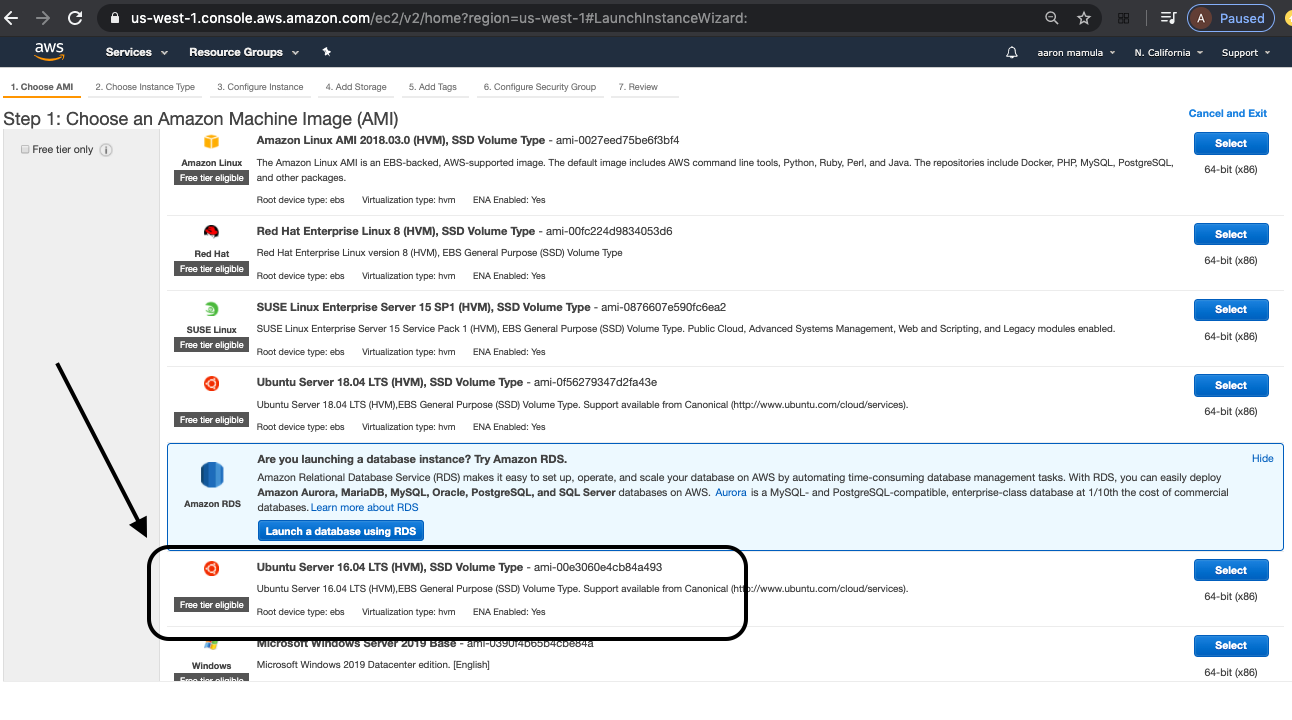
I had two reason for choosing this AMI but I fear neither of them is a very good generalizable reason for selecting one AMI over another. My reasons were:
- Ubuntu 16.04 was “free tier” eligible, and
- I wanted a Linux distribution and I have some very remedial experience with the Ubuntu Linux distribution.
After choosing the AMI, here are the remaining set-up steps for launching an AWS/EC2 Instance:
3.1. EC2 Instance type
I choose the “t2-micro” instance type as this is kind of a proof-of-concept so I don’t need a ton of computing power.
3.2. Configure EC2 Instance
| field | value |
|---|---|
| Network | mams-vpc |
| Subnet | mams-vpc-pub-sub |
| Auto-assign Public IP | Enable |
3.3. Add Storage
I accepted the default 8 GB of storage here and moved on pretty quickly.
3.4. Add Tags
Another short step. I named this EC2 Instance public-vm-1 for no real good reason.
3.5. Configure Security Group
I attached my EC2 Instance to the public-vm-sg security group that I created above.
3.6. Review and Launch EC2 Instance
The noteworthy part of this process is the generation of the key pair. AWS uses public key cryptography to encrypt login info. Before launching my EC2 Instance, AWS generates a key pair for me. This key pair file must be downloaded and saved in order to connect to an EC2 Instance.
After all that, I have an EC2 Instance up and running.
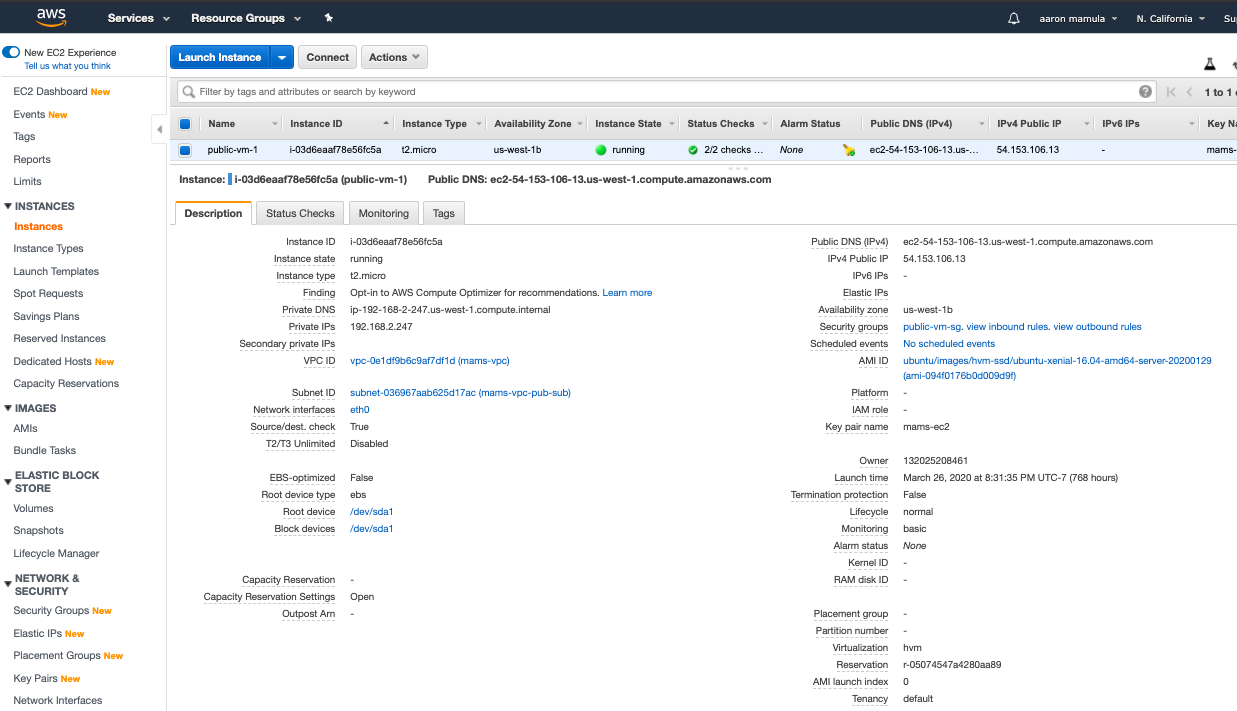
4. Connect to the EC2 Instance
Quick admission: I connect to my EC2 Instances exclusively via ssh from the terminal on my Mac laptop. If there are other ways, I have no idea what they are.
On the EC2 Dashboard there a “Connect” button that provides details on how to connect to the EC2 Instance.
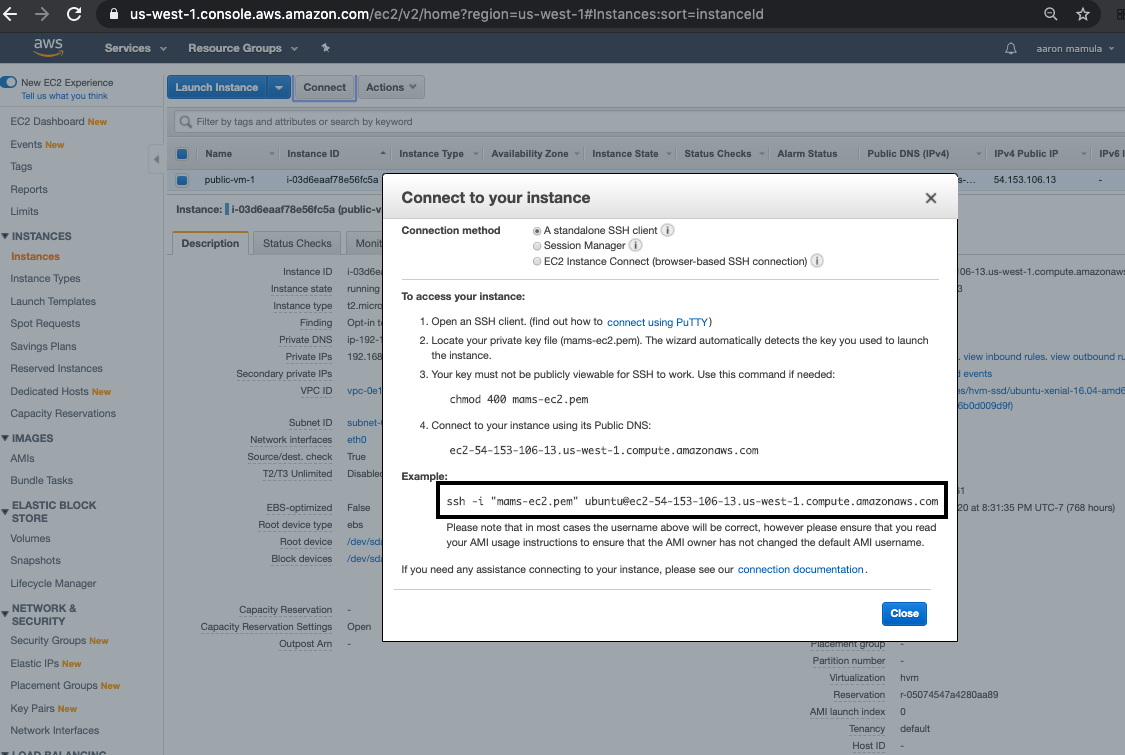
Using the example ssh command given above I can connect to my EC2 Ubuntu server through my Mac terminal. Note that I first navigate to my “Desktop” directory. That’s because I stored my key pair file (mams-ec2.pem) on the Desktop.
(base) aarons-MacBook-Air-2:~ aaronmamula$ cd ~/Desktop
(base) aarons-MacBook-Air-2:Desktop aaronmamula$ ssh -i "mams-ec2.pem" ubuntu@ec2-54-153-106-13.us-west-1.compute.amazonaws.com
Welcome to Ubuntu 16.04.6 LTS (GNU/Linux 4.4.0-1101-aws x86_64)

 * Documentation:  https://help.ubuntu.com
 * Management:     https://landscape.canonical.com
 * Support:        https://ubuntu.com/advantage

 * Ubuntu 20.04 LTS is out, raising the bar on performance, security,
   and optimisation for Intel, AMD, Nvidia, ARM64 and Z15 as well as
   AWS, Azure and Google Cloud.

     https://ubuntu.com/blog/ubuntu-20-04-lts-arrives


15 packages can be updated.
0 updates are security updates.


*** System restart required ***
Last login: Fri Apr 24 15:01:54 2020 from 67.180.160.152
ubuntu@ip-192-168-2-247:~$
EUREKA! I’m in.
IMPORTANT NOTE HERE: when using ssh to connect to your EC2 Instance the first argument is the name of the key pair file and the second argument is the public dns or endpoint of the EC2 Instance. The first time I tried to connect I got an error message saying that permissions for my key pair file were too open. If this happens to you here is a short but elegant post on how to fix that issue.
5. Connect the EC2 Instance to the RDS Database
5.1. Make sure a MySQL Client is available
In order to connect to the database, I will need to have a MySQL Client installed on the EC2 instance. I’m cheating a little as I have already installed the MySQL client on my EC2 Instance, a fact I can verify by executing:
ubuntu@ip-192-168-2-247:~$ whereis mysql
mysql: /usr/bin/mysql /etc/mysql /usr/share/man/man1/mysql.1.gz
ubuntu@ip-192-168-2-247:~$
If you need to install a MySQL Client on an Ubuntu server I recommend trying something like:
ubuntu@ip-192-168-2-247:~$ sudo apt-get install mysql-client-5.7
5.2. Connect to the database
In order to connect my EC2 Instance to my RDS database, I need the database endpoint. This is found by going to the AWS RDS Dashboard finding the database I want to connect to, and looking at the “Connectivity and Security” tab.
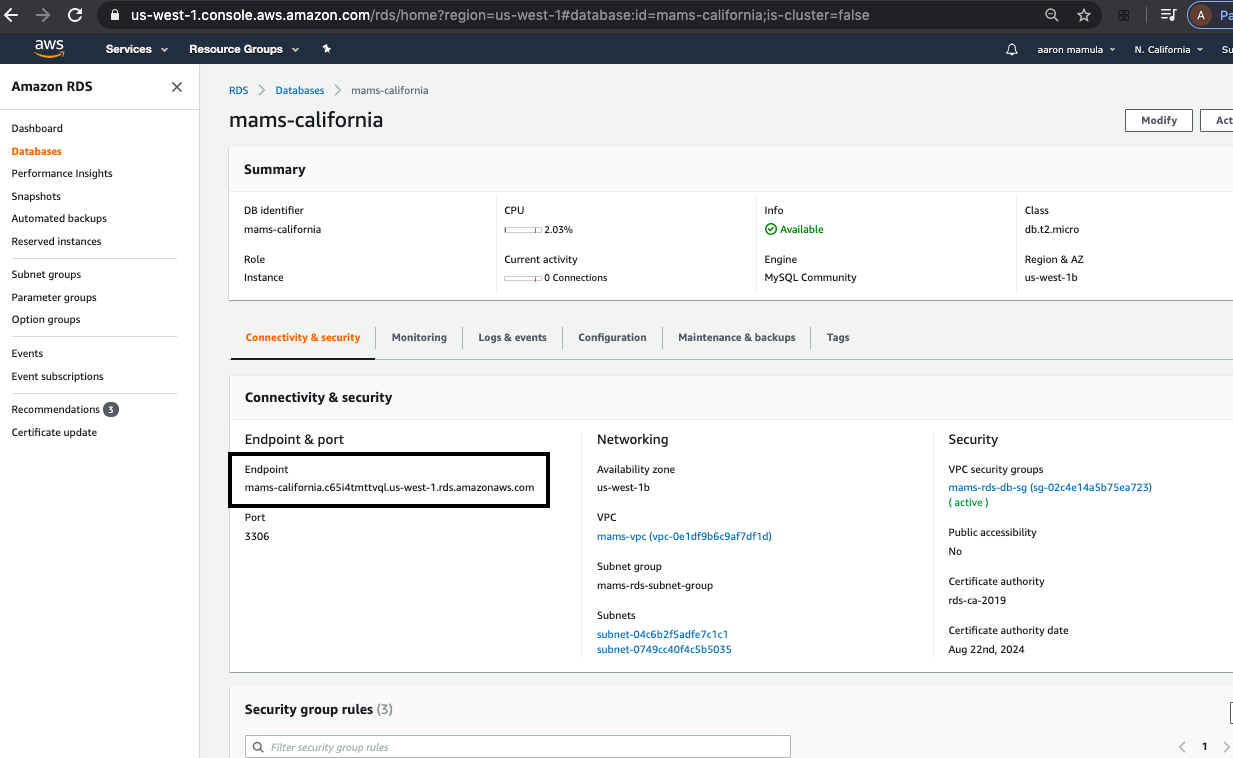
The general form of the connection string is:
mysql -h database-endpoint -u username -p
After entering the database endpoint and username you will be prompted to enter the database password. Here’s what it look like for me:
ubuntu@ip-192-168-2-247:~$ mysql -h mams-california.c65i4tmttvql.us-west-1.rds.amazonaws.com -u ***** -p
Enter password:
Welcome to the MySQL monitor.  Commands end with ; or \g.
Your MySQL connection id is 7475
Server version: 5.7.26-log Source distribution

Copyright (c) 2000, 2020, Oracle and/or its affiliates. All rights reserved.

Oracle is a registered trademark of Oracle Corporation and/or its
affiliates. Other names may be trademarks of their respective
owners.

Type 'help;' or '\h' for help. Type '\c' to clear the current input statement.

mysql>
Finally, I’ll confirm that everything is as expected by showing the databases available to me through this connection. Then displaying the database tables inside the minty hippo database that I created when I initialized this database instance.
Additionally, before I wrote this up I added a table called “USERS” to the mintyhippo database and I shoved a couple rows on data into this table just so there would be something to query here.
mysql> show databases;
+--------------------+
| Database           |
+--------------------+
| information_schema |
| innodb             |
| mintyhippo         |
| mysql              |
| performance_schema |
| sys                |
| tmp                |
+--------------------+
7 rows in set (0.00 sec)

mysql> use mintyhippo;
Reading table information for completion of table and column names
You can turn off this feature to get a quicker startup with -A

Database changed
mysql> show tables;
+----------------------+
| Tables_in_mintyhippo |
+----------------------+
| USERS                |
+----------------------+
1 row in set (0.00 sec)

mysql> select count(*) from USERS;
+----------+
| count(*) |
+----------+
|        3 |
+----------+
1 row in set (0.00 sec)